 RSS Feed
 Twitter
 12:17 AM
 Unknown
Are you using multiple iSeries systems? It is sure that you need distributed data management (DDM) to connect multiple iSeries systems to work as a group.
How to set up DDM?
Ensure that logical partitions are configured and you can set up a very high-speed Ethernet called a virtual Ethernet. Next make sure that the transmission control protocol (TCP) is configured.
When the virtual Ethernet is assigned an IP address, ensure that the DDM server is running. Configure the TCP/IP DDM server to start and set the settings for this via the iSeries Navigator after configuring your TCP environment and making sure your data has routes to follow.
Next, look under "Network/Servers/TCPIP/DDM" for the following screen:
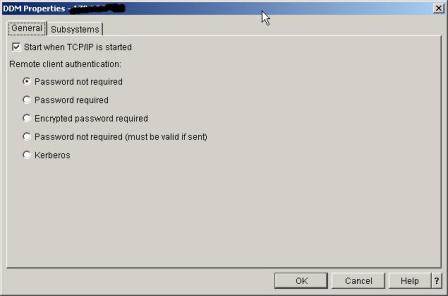
There are several questions. If the password is not required, it doesn't mean the connection is unsecured. On both systems, the user ID is required. After that, accessing to files will be restricted and those files are properly secured.
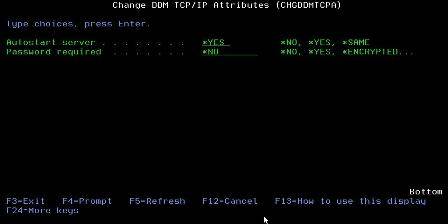
Do these steps to access the green screen version
1. Type CFGTCP
2. Select option 20 for "Configure TCP/IP applications"
3. Select option 5 for "Change DDM TCP attributes"
And below are these settings.
How to create and configure the DDM file
You need to configure the DDM file itself via the CRTDDMF, or Create DDM file, command. But this has some limitations. Firstly, when you create a DDM file over the physical file, this doesn't mean you have access to the logical files. You need to create DDM files over the logical if you want access to the logical files. Secondly, you cannot use DDM files via SQL but you can if you use a remote connection to your databases.
In order to connect to remote iSeries systems for SQL access, the system needs to know where to go to fetch this information. For this reason, the ADDRDBDIRE, or ADD Remote Database Directory Entry, command can be used.
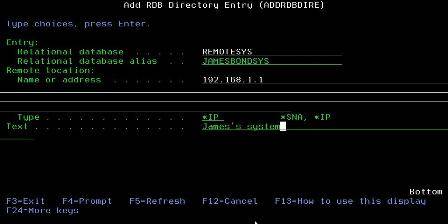
Your remote system would be named REMOTESYS while you could use JAMESBONDSYS as an alias to access your systems without serial numbers.
You would use the SQL command CONNECT TO to initiate a communication on a SQL level to that system. With DDM files, for program access you would not change your programs to access the remote systems. The program opens the file, initiates the communication to the remote system and allows for access.
Creating the DDM files is simple.
Firstly, type the command CRTDDMF and press F4:
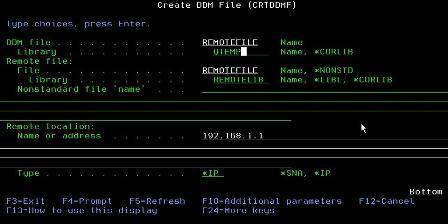
Your remote file will reside in its normal library.
If you want to test this out, on all systems there's an IP address called "Home." If you ever see a t-shirt that says, "There's no place like 127.0.0.1," it's a goof on both The Wizard of Oz and on "Home," which is located at IP address 127.0.0.1. Configure your IP address to "Home," and you'll see this in action.
Finally, SQL has been configured, and you've setup a remote database entry so that the system knows where to find the information. How do we do this for our SQL RPG programs? Hit F4 to prompt the compile in PDM (option 14) or use the CRTSQLRPGI command and look for the "Relational Database" portion.
Remember what you put into the prompt for the ADDRDBDIRE command? Use that remote system name. This will create a package on that remote system that insures connectivity.
Source: search400
 Posted in

.jpg)


